Bespoke Illustrated Wedding Invitations with ornate crests and watercolour floral design
Today I thought I would share the process of design that I used to create some bespoke illustrated wedding invitations with accents of calm lilac, rich gold, burgundy and hints of dark aubergine. I will lead you through my method of design, sharing all the stages that it took for me to create a final range of floral wedding stationery.
Firstly, what are bespoke illustrated wedding invitations all about?
Bespoke illustrated wedding invitations design, is when you work one-to-one directly with a skilled, talented illustrator or design to create custom designed, absolutely bespoke wedding stationery made specifically for you. There will be nothing else that exists that can be compared to your wedding stationery and that’s what you should expect.
Below you can see a sneak peak of the end suite that I designed for my clients. It took quite sometime to arrive at this design ( I’ll share the full design at the end) and I’d love to share this entire bespoke design process with you.

Designed by Crimson Letters designer, Rubana Gaspar.
If you’re thinking about or looking for a bespoke illustrated wedding invitations suite, please reach out at rubana@crimsonletters.com or contact me! I would love to hear from you and start work on your luxury wedding stationery.
What did I need to design for this bespoke illustrated wedding invitations order?
What started off as a simple four-piece wedding invitation suite, (or so I though) rapidly grew arms and legs. I ended up having to create designs for:
- Main invitation
- Invitation Envelope
- RSVP card
- RVSP envelope
- Reception card
- Information card
- Statement card -with a detailed watercolour design
- Envelope liner design – with watercolours
- Calligraphy addressing on envelopes
- A few suites had to be entirely hand painted
- Menus
- Table numbers
- Place names design
- Extra watercolour paper for additional place names
Where did I start from to create the illustrations and artwork?
The very first step of course was any inspiration that the client provides. The best possible way to provide inspiration is a Pinterest board or a mood board. The clients were getting married within the beautiful grand private estate called Dover Hall. The owners had taken great care refurbish the grand house with many antique, heirloom pieces and European art. There are grand fireplaces, ornate ceilings, stonework, historical wooden antiques, gilded gold picture frames and more.
The wedding planner, who was representing the clients, Pamela gave me some images from Dover Hall as well as a mood board that she had compiled for bespoke illustrated wedding invitation’s colour theme. You can see the inspiration below.
Visuals please! The more the better.


All photography of Dover Hall above from this editorial.
I used the centre of this white stone fireplace for an integral part of the design. I will show this to you later!
The clients wanted to echo a strong influence of their wedding venue, throughout the stationery. Alongside this, they also wanted to use delicate shades of sift lilacs and deep purples.
Bespoke illustrated wedding invitations – curated mood boards.
Design inspiration from wedding planners
Let me start by saying that when I design, custom bespoke wedding invitations, visuals are so very important. I love it when wedding planners are organised and have taken the time to curate a collection of mood boards, which gives the stationery designer an instant, clear and concise vision of what the wedding day will be.
From the large pdf of various images that the wedding planner gave me these are the next steps that I took:
- I created my own curated selection of images.
- I focused on pulling a thread of images together that inspired me in the strongest way.
- This helps me to pinpoint my design direction.
- Helps to make the artwork process easier.
Here are the mood boards that I personally compiled, with design inspiration that meant the most to me. I focused in on the colours of lilac, gold, dark and sumptuous aubergine and with an accent dark burgundy (you can see how I use that later too).

Image Credits: Top left, Stilzitat, top right and bottom left, Dover Hall, Bottom right, Emily Riggs.

Image Credits: Top and bottom left, Crimson Letters, bottom left Dover Hall.
The client’s particularly wanted to bring some elements of the lion that you see on the above fireplace. It reminded the bride of her pup. The florals were an indication of their love for lilacs and the general colour palette, yet after some discussion, we decided to hone in on using lilacs and burgundy throughout the suite.
Developing custom artwork – crest design.
After seeing the gold leaves bespoke illustrated wedding invitations inspiration from the mood board above, I knew that the clients wanted some ornate, intricate gold work. Feeling inspired, I dived in. More than anything I do thoroughly enjoy designing intricate, highly detailed crest designs and floral wreaths. You can see more of my crest designs here.
Using the white fireplace for inspiration here ( from the initial images above) below are some of the crest designs that I created.
Hand drawn wedding invitations – how do I go about designing these?
Remember, all of my work is hand made
No art is bought in, that’s why my services are priced at a higher price point than other cheaper stationers. Starting the process, I sit down with a pencil and draw a simple oval, or half a circle. Drawing upon that oval or circle I add in all the details, one by one. Next, using a black fine liner ( or a micron pen which I love to use) I trace all the pencil lines. Or when I want to create gold work, I use my calligraphy dip nib to carefully trace over all the lines. This is very, very time consuming.
You can see below (left) the technique of drawing first, then going over it with a calligraphy dip pen.


Stationery design and calligraphy art by Crimson Letters
Following on, I thought I would share my trick.
When I create highly intricate designs I use a little design hack. Normally, right at the start of my creative design journey I used to design the entire crest design by hand in pencil, then transfer that onto paper using tracing paper and then ink it in, which was extremely time consuming.
Thankfully I now save a huge amount of time. How can you do this? It might seem simple to you. But to me, this was a huge timesaver.
This is a much better approach:
To develop a crest design, I only draw out half of the design. Then, scan in. Adjust with contrast, colour adjust and sharpen. Remove the background and flip!
Here are the crest designs and other gold work that I created. Make sure you let me know in the comments area, which one your favourite is. I would love to know!

Above, lion and small crest.

Floral wreath crest.

This one above was one of my favourites!

Another gold crest with many tiny leaves, all hand outlines with a calligraphy dip pen and individually hand painted.

Last gold crest, or gold artwork piece that I developed. This one was very close to my heart and I adored this design.
Bespoke wedding illustrations
One wonderful aspect about creating your own, curated, bespoke wedding illustrations as I have done with the range above, is that these design will be added to my wider portfolio library. Which means that in a few months, or perhaps a year or so later, if I have another client that I feel these designs may be a good fit for, I will simply reuse and revamp one of these above bespoke wedding invitation gold designs.
See below for example. I used the above frame design for a recent client getting married at Villa Balbiano.


Next step, develop custom watercolour backgrounds
Initially I had come understand that the clients preferred to have a cream or lilac background. However that background didn’t exactly compliment the gold crest designs above that I made.
How did I know that?
In between designing and as I form the designs, I do make some test prints on the way. The gold crest designs just didn’t seem to stand out or look as good on a cream, or pale lilac paper that I had ordered from my paper supplier in London, GFSmith.
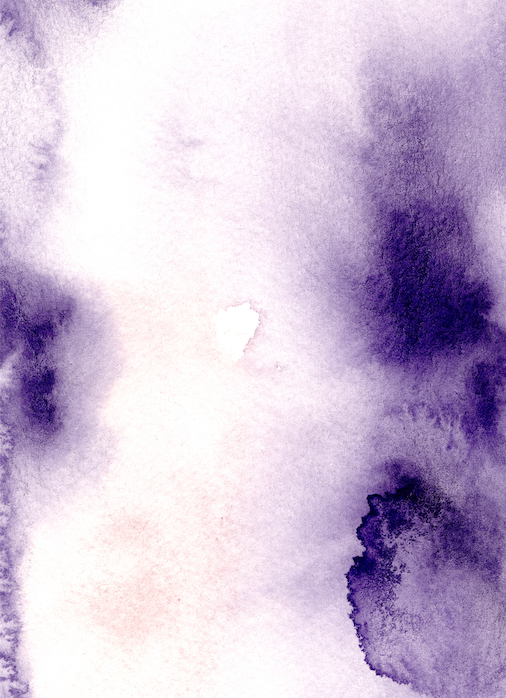
Starting with some watercolour paper and my watercolour set, I began to develop a range of watercolours that you can see below. My main focus was to try and use more of a pale blush colour, that reflected the lightest sift purple/lilac that the clients had in their colour palette.

Darker watercolour options
A little later on into the design process (after showing the first design proposal) the clients asked for a slightly darker shade of aubergine – dark purple to be brought into the watercolour background. This was to compliment and to tie the wedding stationery suite in with a touch of this strong aubergine that you see below.

Below, as you can see, I make sure that I suggest a good variety of complimentary wax seal colours.

Constant communication throughout a bespoke order
Again, when I work on a bespoke illustrated wedding invitations order, I have to communicate constantly with the clients and make sure that I take their opinions and design directions into consideration and act upon them.
Here below I remade the watercolour backgrounds.

Bespoke illustration wedding invitations – calligraphy & design compilation
Following on, using what I had made and shared with you so far I began to make some initial design concepts.
Before reaching this stage I had to create bespoke calligraphy by hand and spend time digitalising it and remove the background.
I don’t do this step myself because I find it very time consuming and believe me there are many other things that I could use my time for. Therefore, I always outsource this step to a design pro that I have worked with time and time again and have come to trust implicitly.
Below you can see the hand made calligraphy. Calligraphy takes years to hone and practise as a skill. As you can see from below, I always make at least 4-6 options from which I select the best one to send off to be digitalised – or vectorised. This means that it is cleared up for printing and digital use.

Calligraphy above is in its raw, natural hand drawn form, pre-digitalised.
Here is the calligraphy that was digitalised (below). I have shown you one full size version of calligraphy below, to display the quality.

For ease of uploading images the other calligraphy words, I added them altogether to save time, so I’m afraid the quality is lower and pixelated a little!


Bespoke Calligraphy
Here is a list of words that I made many options for, remember at least 4-6 options per word, that I digitalised. Then, I scanned in all the calligraphy to begin work. You can image the amount of design work here!
- Couples initials “CA”
- Information
- Accommodations
- Transportation
- Reply card
- Please Reply
- Respond
- Initial M for the name space on the reply card
- Menu
- Desserts
- Wedding Cake
- Church details
- Couples full names
- Wedding venue
- Black Tie
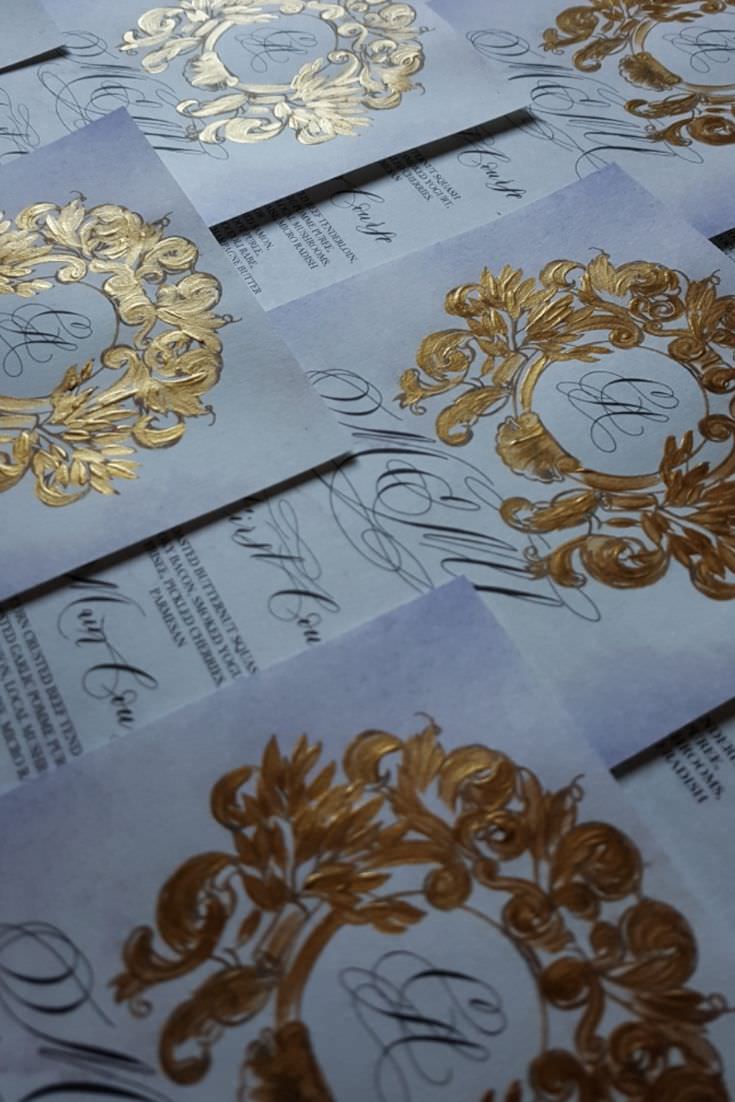
Design compilation
Following on, I can now finally show you the various design concepts that I gave to my client. Using all of the previously show artwork for the bespoke illustrated wedding invitations, I started bringing in each element, the gold crests, the watercolour backgrounds, the digitalised calligraphy and some text to form designs.
Reception card – You can see from the top the first designs, through to the bottom, the final design. Altogether I created at least 3-4 different design proposals which were tweaked along the way with the client’s selections and preferences.

The (above) design they felt was far too busy and a little bit to over the top. Alongside this, the clients’ preferred for the calligraphy to be centred with the top “Reception” title and the information about the venue and black tie beneath. I set to work, removing the extra leaves and floral elements from the design as advised.

Following on, (above) you can see how I managed to clear up and refine the design. From this point, the clients wanted me to use a slightly darker background. Therefore, (as you can see below) I adjusted the watercolour with just a hint of the aubergine envelope’s colour to be added into the watercolour background. These watercolour backgrounds were taken from the above area of watercolour backgrounds that I developed.

Here are the other final bespoke illustrated wedding invitation pieces for you to see. It was not easy to arrive at these below designs and with some designs such as the information card, I had to change it a few times before we were on the right design track.


I was really happy with the way that the above designs turned out. Moving on, I continued working to design the last bespoke watercolour illustration invitation items.
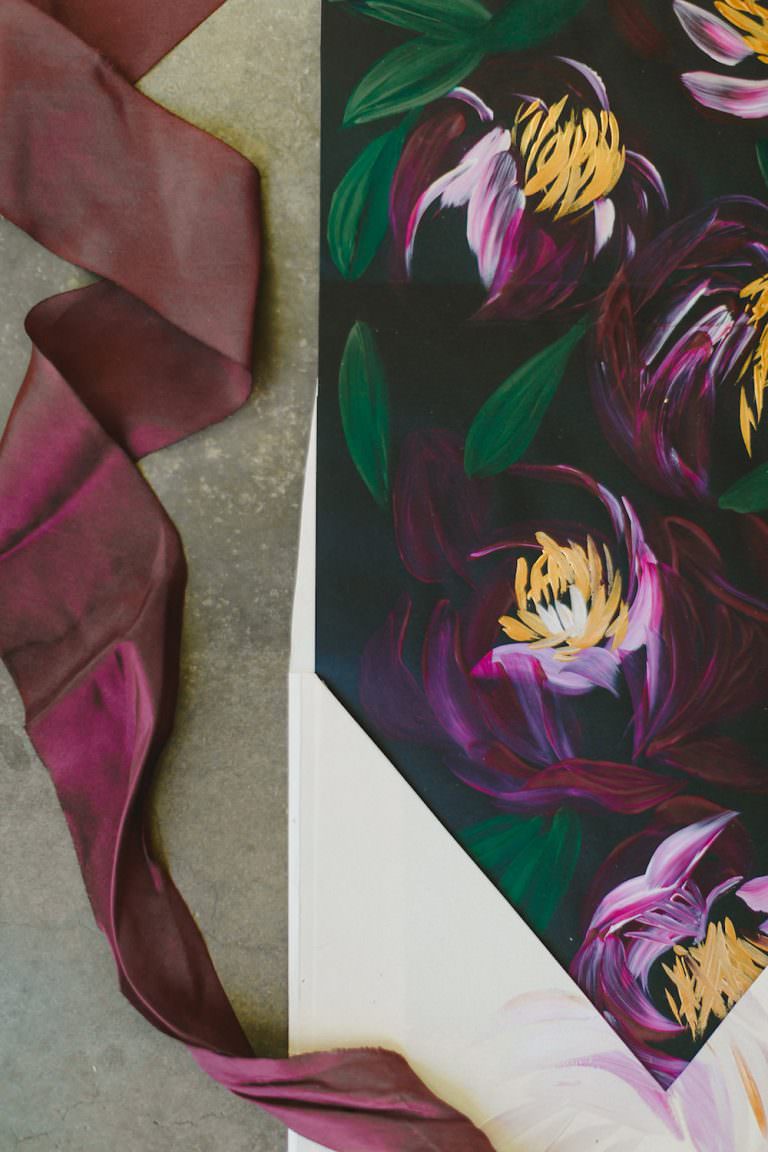
The last items, were a statement piece, featuring a rose illustration, an envelope liner and a special envelope design for the rsvp envelope.
Let me show you (below) the steps I went through to design the rose watercolour illustration.
Bespoke watercolour illustration card – statement piece
In addition to the other artwork, the clients wanted a bespoke watercolour illustration of a rose design. This piece will become a statement piece within the wedding stationery suite.
The first rose watercolour that I hand painted, wasn’t quite good enough and didn’t hit the mark. Although I was happy with the style I knew that the composition of the rose needed work. Alongside this the clients wanted a rose that was much darker in colour and to focus on a deep wine colour to match the curtains at their wedding venue, Dover Hall.

Starting again, I sourced an image via Pinterest and started to develop a new rose watercolour illustration. Upon my Pinterest account I store a plethora of floral pictures so that I can use them for my abstract watercolour floral illustrations that you can see here. These images act as a great source of design inspiration. I love using these floral watercolours for invitation wraps and envelope liners.
Below if you scroll down, I’ve taken you through how I created this watercolour, step by step as well as a video tutorial.
Here (below) is the image I found via Pinterest and used for the main design.

Take a closer look at my bespoke illustrated wedding invitations – Stages of watercolour
Using the above image, and another image with some rose buds and branches, I started to sketch the outline and start on the watercolour of the rose itself. Yes, I know. It does rather resemble a red cabbage at this stage doesn’t it! Follow the stages through and the videos. You can see how step by step, you can easily watercolour a rose illustration.


You don’t need to worry about the pencil lines, they will eventually be hidden. Watercolour is all about working in stages, especially detailed watercolour like this. The process is a slow carefully planned one but it is so rewarding at the end.

This time, I was quite happy with the final result. See the final image of the statement piece below. All I needed to do next, was add the couples initial from the digitalised calligraphy.


Fortunately, this time the artwork was a huge hit. I was so happy with the outcome of this second illustration, it was well worth reinvesting more time. The clients were really pleased with the way this piece looked and I simply added on their initials which had been previously digitalised.
Continuing with the bespoke illustrated wedding invitations – envelope liner
Moving on, I commenced work on the envelope liner.
If you’re wondering what on earth an envelope liner is ( or you need help with any other invitation terminology) look at this Invitation Glossary helpful guide here.
The clients specifically wanted some bold, floral watercolours. To begin with they were unsure as to the exact colours they wished to use. However in the end, I understood that they wanted to use lilacs predominantly with a few hints of burgundy from their venue’s interiors.
Using their colours as a guide I started to create a series of bespoke watercolour floral designs. Next, I scanned the designs in, removed the backgrounds and created separate envelope liner designs.
Here are some of the envelope liner designs that I proposed to my clients.


These two designs above, reflect more of their initial colour palette. Below, I move onto only designing with deep reds and lilacs.


This design below was the clients final choice. I like how they decided to add the rose within the centre of their envelope liner.

Where there any hiccups with this bespoke illustrated invitations order? What went wrong?
With every single order that I have taken on for bespoke illustrated wedding invitations, or custom design clients, there is always a challenge somewhere. Something goes wrong along the way. This happens every single time.
I’ve had two printers malfunction and refuse to print.
Challenges with handmade paper, that actually broke a printer.
With this order, it was the envelopes.
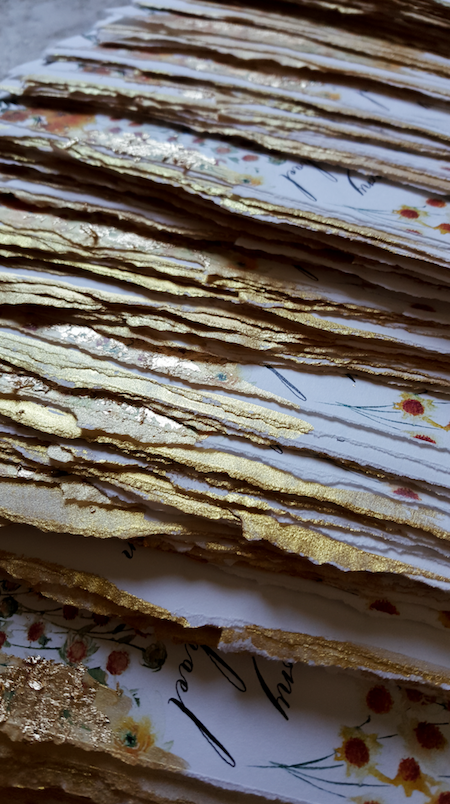
When I order my envelopes, I count on them to be delivered on time and in good condition. They have to arrive as soon as I order them to allow enough time for calligraphy. It can easily take an entire week to add calligraphy addressing onto the main invitation and rsvp envelopes. Depending on how many I have to complete. Calligraphy requires a lot of skill and dedication and needs time to perfect.
Terrible customer service
This I was dismayed over my experience with my envelope suppliers. Not only had they gone missing and took 3 weeks to get to me, after I had to track them down (something I did not have time for). To add to the late delivery, one quarter of the 100 envelopes that I had ordered were badly damaged at the edges. They were so badly and loosely packaged that so many of them as a result were not useable.
When I gave them a bad review, the company in question were very upset. They harassed me to adjust and change their review. They made no apology to attempt to offer a partial refund, an exchange or any assistance. It was customer service at it’s lowest ever. I would NEVER dare to treat a client of mine like this. If I had done something wrong, of course I would not only apologise unreservedly, but I would work tirelessly to rectify the situation.
I find it very, very sad that now companies are more concerned with adjusted their reviews rather than actual customer service.
Thankfully, I did order enough extra envelopes, for there to be just enough to complete the calligraphy addressing. Here (below) you can see the final envelopes.

Wax seal stamp custom design
Continuing on, let’s explore the custom wax seal design. Many clients are now looking for complimentary and bespoke wax seal stamp designs for their envelope sealing. My clients also desired a distinctive wax seal stamp design to be made. Below, you can view some of various designs that I proposed.


Here’s the final bespoke illustrated wedding invitations
Following on, something that I do feel extremely passionate about, is presenting my clients with photos of their invitations, printed out and prepared. Most of the stationers I know, offer digital proofs and don’t present the final invitations. To offer that extra service, I always make sure to show them what their invitation suite will look like.
Sometimes timelines can be quite limiting and although I cannot always offer this service, I do however like to show printed out invitation suites as often as possible.
Digital proofs do look so brighter upon the screen and can look duller once printed out. Care needs to be taken to try as much as possible to colour match so that the final suite is more in line with a client’s expectations.
Here below is the final bespoke collection of my client’s wedding stationery.


Day of items
Additionally to create a coherent end collection I had to work on a range of designs for the wedding day items. Menus, place names and table numbers. I really wanted to menus to stand out on the wedding day, so I hand painted the crest on all of the 120 menus. Which paint is the best to use? I make sure that I used gold acrylic paint. The brand that I most often use is Windsor & Newton. It is a little thick and depending upon the climate that you’re in, it can dry out quite quickly. After you squeeze it out, make sure you add a good small blob of water, just a few drops will do. Mix it well and it’s ready to use.
Alongside the menus, I also hand painted 10 special place names. You can see them in the pictures below.


Conclusion
Finally, you can clearly see that a bespoke or custom designed stationery suite takes up such an incredible amount of time. I take great pride over developing the most beautiful wedding stationery designs for my clients and literally do pour my heart into refining the end product.
In the end this was easily a two month intensive working period.
Any Question or Comments?
If you have any comments, or questions, I would love to hear from you! I read and reply to every single comment (and try and send an email reply back to you as long as it’s not spammy). If you have any questions that you’d like to ask, please don’t hold back and ask me!
Here are some other articles that you might be interested in as well:
Creating watercolour illustrations, one everyday for a week
French style wedding invitation and the process of design
London wedding invitations with black tie themes ideas
A detailed watercolour illustration tutorial and peak behind the scenes
Tips and etiquette for your destination wedding stationery
Planning a fabulous wedding weekend